Manufacturing Process Specification for Pipe Fittings
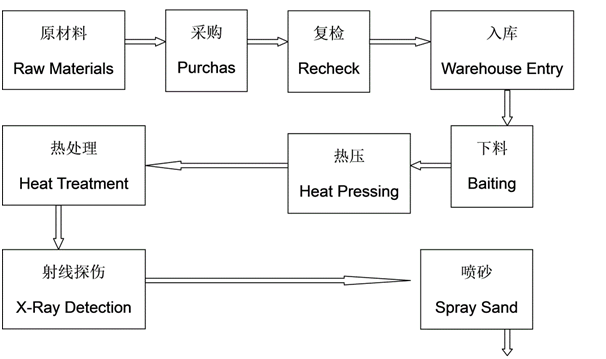
1、ELOBW Technological Flow Sheet

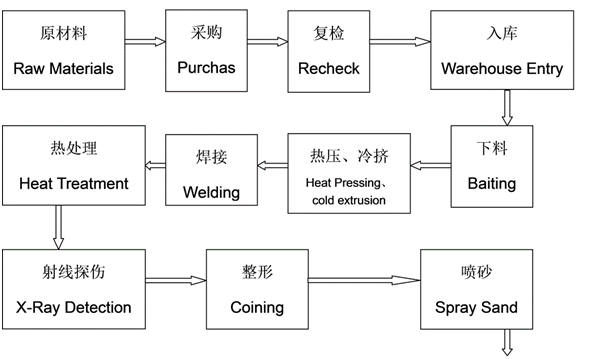
2、Reducer Technological Flow Sheet

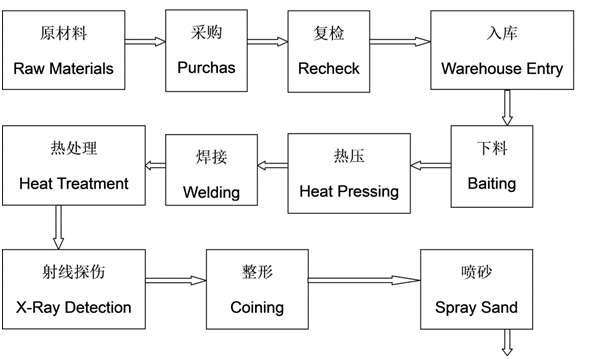
3、Tee Technological Flow Sheet

4、Cap Technological Flow Sheet

一、Material
1.1 The selection of materials shall comply with the relevant standards of the pipe production country and the raw material standards required by the Owner.
1.2 After entering the factory, the inspector shall first verify the original material certificate issued by the manufacturer and the material commodity inspection report of the import manufacturer. Check whether the identification on the material is complete and consistent with the quality certificate.
1.3 The newly purchased materials shall be re inspected. The chemical composition, length, wall thickness, outer diameter (inner diameter) and surface quality of the materials shall be strictly inspected according to the standard requirements. The batch number and pipe number of the materials shall be recorded. Nonconforming materials are not allowed to be warehoused and processed. The inner and outer surfaces of steel pipes shall be free of cracks, folds, scabs, delaminations and hairlines. These defects shall be completely removed, and the removal depth shall not exceed the negative deviation of the nominal wall thickness. The actual wall thickness at the location to be cleaned shall not be less than the minimum value allowed by the wall thickness. On the internal and external surfaces of steel pipes, the allowable defect size shall not exceed the relevant provisions in the corresponding standards, otherwise it shall be rejected. The oxide skin on the internal and external surfaces of the steel pipe shall be removed, and anti-corrosion treatment shall be carried out. The anti-corrosion treatment shall not affect the visual appearance inspection, and can be removed.
1. Mechanical properties
The mechanical properties shall meet the standards respectively, and the chemical composition, geometric dimensions, appearance and mechanical properties shall be rechecked and accepted.
2. Process performance
2.1 100% ultrasonic nondestructive testing shall be carried out for steel pipes one by one according to SEP1915, and standard samples for ultrasonic testing shall be provided. The defect depth of standard samples shall be 5% of the wall thickness, and the maximum shall not exceed 1.5
2.2 Flattening test of steel pipe
3 Actual grain size
The actual grain size of finished pipes shall not be greater than Grade 4, and the grade difference of steel pipes of the same heat number shall not exceed Grade 2. The grain size shall be inspected according to ASTM I 12-95, and the inspection times shall be once for each heat number and each heat treatment batch.
4. Cutting and blanking
4.1 Before blanking alloy pipe fittings, accurate material calculation shall be carried out first. According to the calculation results of pipe fitting strength, analysis shall be made and the influence of many factors such as thinning and deformation of pipe fittings during production on key parts of pipe fittings (such as the thickness of the outer arc of the elbow, the shoulder of the tee, etc.) shall be considered. Materials with enough margin shall be selected, And consider whether the stress enhancement coefficient of the formed pipe fittings conforms to the design stress coefficient of the pipeline, the flow area of the pipeline and other factors. The radial material compensation and shoulder material compensation shall be calculated for the hot pressed tee during the pressing process.
4.2 For alloy pipe materials, the gantry band saw cutting machine is used for blanking. For other materials, cutting with flame is generally avoided, and band saw is used for cutting to prevent defects such as hardening layer or cracks caused by improper operation.
4.3 When cutting and blanking according to the design requirements, the external diameter, wall thickness, material, pipe number, furnace batch number, pipe blank flow number and other contents of raw materials shall be marked and transplanted. The identification shall be made by means of low stress steel seal and paint spraying. The operation contents shall be recorded on the production process flow card.
4.4 After blanking of the first piece, the operator shall conduct self inspection and report to the special inspector of the testing center for special inspection. Blanking of other pieces shall be conducted after the inspection is qualified, and each piece shall be tested and recorded.
5. Hot pressing (pushing) molding
5.1 The hot pressing process of pipe fittings (especially tees) is an important process, and the fuel oil heating furnace can be used to heat the blanks. Before heating the blank, firstly use hammer, grinding wheel and other tools to clean the chip angle, oil, rust, copper, aluminum and other low melting point metals on the surface of the blank tube. Check whether the identification of the blank meets the design requirements.
5.2 Clean the sundries in the furnace hall of the heating furnace, check whether the circuit, oil circuit, trolley and temperature measurement system of the heating furnace are normal, and whether the oil is sufficient.
5.3 Place the blank in the heating furnace for heating. Use refractory bricks to isolate the workpiece from the furnace bench for 20. Strictly control the heating speed at 150 ℃/h according to different materials. Heat the workpiece to 30-50 ℃ above AC3 for more than 1 hour. Digital display or infrared thermometer shall be used for monitoring and adjustment at any time during heating and insulation.
5.4 When the blank is heated to the specified temperature, it shall be taken out of the furnace for pressing. The pressing shall be completed with a 2500 ton press and pipe fitting mould. During the pressing, the temperature of the workpiece during the pressing process shall be measured with an infrared thermometer and shall not be less than 850 ℃. When the workpiece cannot meet the requirements for one pressing and the temperature is too low, the workpiece shall be returned to the furnace for reheating and heat preservation before pressing.
5.5 For the hot forming of products, the rule of metal flow of thermoplastic deformation during the forming process of finished products shall be fully considered. The formed mold tries to reduce the deformation resistance caused by the hot processing of the workpiece, and the pressing tire mold is in good condition. The tire mold shall be verified regularly according to the requirements of the ISO9000 quality assurance system to control the thermoplastic deformation of materials, so that the actual wall thickness of any point on the pipe fittings is greater than the minimum wall thickness of the connected straight pipe.
5.6 For large diameter elbow, medium frequency heating shall be used for push molding, and TW1600 extra large elbow pusher shall be used for push molding equipment. During the pushing process, the heating temperature of the workpiece is adjusted by adjusting the power of the intermediate frequency power supply, which is generally controlled at 950-1020 ℃, and the pushing speed is controlled at 30-100 mm/min.
6 Heat treatment
6.1 For finished pipe fittings, our company shall carry out heat treatment in strict accordance with the heat treatment system specified in the corresponding standards. Generally, the heat treatment of small pipe fittings can be carried out in a resistance furnace, while the heat treatment of large diameter pipe fittings or elbows can be carried out in a fuel oil heat treatment furnace.
6.2 The furnace hall of the heat treatment furnace shall be clean and free of oil, ash, rust and other metals different from the treatment materials.
6.3 Heat treatment shall be carried out in strict accordance with the heat treatment curve required in the “Heat Treatment Process Card”, and the temperature rise and fall speed of alloy steel pipe shall be controlled less than 200 ℃/hour,
6.4 The automatic recorder shall record the temperature rise and fall at any time and automatically adjust the temperature and holding time in the furnace according to the preset parameters. During the heating process of pipe fittings, the flame shall be blocked by a fire wall to prevent the flame from directly spraying onto the surface of pipe fittings, so as to ensure that the pipe fittings will not overheat or burn during the heat treatment process.
6.5 After heat treatment, alloy pipe fittings shall be subject to metallographic inspection one by one. The actual grain size shall not be greater than Grade 4, and the grade difference of pipe fittings of the same heat number shall not exceed Grade 2.
6.6 Conduct hardness test on the pipe fittings after heat treatment to ensure that the hardness value of any part of the pipe fittings does not exceed the range of standard requirements.
6.7 After the heat treatment of pipe fittings, the oxide skin on the internal and external surfaces shall be removed by sandblasting until the metallic luster of the material is visible. Scratches, pits and other defects on the material surface shall be polished with grinding wheel and other tools. The local thickness of the pipe fittings after grinding shall not be less than the minimum wall thickness required by the design.
6.8 Fill in the heat treatment record according to the pipe fitting number and identification, and re write the incomplete identification on the pipe fitting surface and circulation card.
7 Groove processing
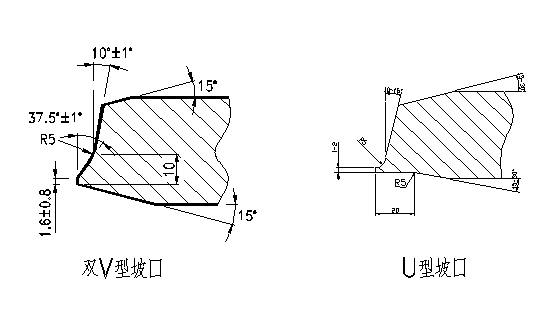
7.1 The groove of pipe fittings is processed by mechanical cutting. Our company has more than 20 sets of lathes, power heads and other machining equipment, which can process the double V or U groove, internal groove and external groove of various thick wall pipe fittings according to the requirements of the Tenderee. The company can completely process in accordance with the groove drawing and technical requirements provided by the Tenderee to ensure that the pipe fittings are easy to operate and weld during the welding process.

7.2 After the pipe fitting groove is completed, the inspector shall inspect and accept the overall dimensions of the pipe fitting according to the drawing requirements, and rework the products whose geometric dimensions are unqualified until the products meet the design dimensions.
8 Welding
8.1 The welding of pipe fittings such as “welding tee” and “welding elbow” to be welded shall be carried out by professional welders with many years of welding experience, and appropriate welding procedure qualification shall be conducted according to the requirements. Mechanical property tests shall be conducted on the welds, and the welding shall be conducted under the guidance of appropriate process specifications. The welding process shall adopt qualified welding procedure qualification, which shall comply with the provisions of ASME Boiler and Pressure Vessel Code, Volume IX, Welding and Brazing Procedure Qualification. The welder shall also be qualified according to this assessment. In the process of welding, if the welding items of the welder are inconsistent with those passed the examination, welding cannot be carried out. During the welding process, the quality assurance engineer shall monitor and measure the stop point and witness point of the welding process to ensure that there are no defects and problems in the key process of welding.
8.2 The welding process shall be carried out in strict accordance with the “Welding Process Instruction Card” formulated by the company. First, dry the welding rods, and put the dried welding rods in the incubator for future use. The far-infrared electromagnetic heating design is used to preheat the base metal within 300 mm on both sides of the crater at 300 ± 30 ℃. The argon arc welding primer and manual arc welding are used for filling and covering. During the primer, the pipeline is filled with argon for protection to prevent overheating and oxidation. The interpass temperature shall be controlled below 400 ℃ during welding. During welding, the joints between layers shall be polished with hammer or grinding wheel, and the welding slag and spatter shall be cleaned.
8.3 The post welding heat treatment of pipe fittings can be carried out in an electric resistance furnace or an oil fired furnace, or in a far-infrared heating furnace, to ensure that the welded joints have the same mechanical properties and other technical indicators as the base metal.
8.4 The welds of welded pipe fittings must be subject to 100% radiographic or ultrasonic testing, and the ultrasonic testing shall reach Level I according to JB4730-94, and the radiographic testing shall reach Level II.
9 Inspection
9.1 All pipe fittings shall be tested according to standard requirements before delivery. According to the requirements of ASME B31.1, all inspections shall be completed by professional inspectors with corresponding qualifications recognized by the State Bureau of Technical Supervision.
9.2 Magnetic particle (MT) testing shall be carried out on the outer surface of tee, elbow and reducer, ultrasonic thickness measurement and flaw detection shall be carried out on the outer arc side of elbow, shoulder of tee and reducer reducer, and radiographic or ultrasonic flaw detection shall be carried out on the welds of welded pipe fittings. The forged tee or elbow shall be subject to ultrasonic testing on the blank before machining.
9.3 Magnetic particle flaw detection shall be carried out within 100mm of the groove of all pipe fittings to ensure that the groove is free from cracks and other defects caused during cutting.
9.4 Surface quality. The inner and outer surfaces of the pipe fittings shall be free of cracks, shrinkage cavities, ash, sand, folding, missing welding, double skin and other defects. The surface shall be smooth without sharp scratches. The depth of the depression shall not exceed 1.5mm. The maximum size of the depression shall not be greater than 5% of the circumference of the pipe and shall not be greater than 40mm. The weld surface shall be free of cracks, air holes, arc pits, splashes and undercuts, and the internal corners of the tee shall be smooth. 100% surface appearance inspection shall be conducted for all pipe fittings. The cracks, sharp corners, pits and other defects on the surface of the pipe fittings shall be polished with a grinder, and the grinding place shall be subject to magnetic particle flaw detection until the defects are eliminated. The thickness of the polished pipe fittings shall not be less than the minimum design thickness.
9.5 The following tests shall also be conducted for pipe fittings with special requirements of customers:
9.5.1 Hydrostatic test
All pipe fittings can be subject to hydrostatic test with the system (the hydrostatic test pressure is 1.5 times of the design pressure, and the time is not less than 10 minutes). Under the condition that the quality certificates are complete, the ex factory pipe fittings may not be subject to hydrostatic test.
9.5.2 Actual grain size
The actual grain size of finished pipe fittings shall not be greater than Grade 4, and the grade difference of pipe fittings with the same heat number shall not exceed Grade 2. The grain size shall be inspected according to the method specified in YB/T5148-93 (or ASTM E112-95), and the inspection times shall be once per heat number+per heat treatment batch.
9.5.3 Microstructure:
The manufacturer shall carry out the microstructure inspection and provide the microstructure photos according to the relevant provisions of GB/T13298-91 (or the corresponding international standards). The inspection times shall be per heat number+size (diameter × Wall thickness)+heat treatment batch once.
10. Packaging and identification
After the pipe fittings are processed, the outer wall shall be coated with antirust paint (at least one layer of primer and one layer of finish paint). The finish paint of carbon steel part is gray, and the finish paint of alloy part is red. The paint shall be uniform, without bubbles, wrinkles and peeling. The groove shall be treated with special antirust agent.
Small forged pipe fittings or important pipe fittings are packed in wooden cases, while large pipe fittings are generally packed in bare. The orifices of all pipe fittings shall be firmly protected by rubber (plastic) rings without damaging the pipe fittings. Ensure that the final shipped products are free of any defects such as cracks, scratches, pull marks, double skin, sticky sand, interlayer, slag inclusion, etc.
The pressure, temperature, material, diameter and other pipe fitting specifications shall be marked on the obvious part of the pipe fitting product. Low stress steel seal is adopted.
11. Shipping
Qualified transportation mode shall be selected for pipe fittings delivery according to actual conditions. Generally, domestic pipe fittings are transported by automobile. In the process of automobile transportation, it is required to firmly bind the pipe fittings and the vehicle body with soft packaging tape with high strength. Collision and friction with other pipe fittings shall not be allowed during vehicle driving, and rain proof and damp proof measures shall be taken.
When the pipe fittings are delivered, the delivery status of alloy steel pipe fittings is: normalizing+tempering; Delivery status of carbon steel: normalizing.
12. Technical documents available
Various quality records, reports and technical documents shall be reviewed as required before the delivery of products, which can be reviewed by the Owner before delivery. Documents submitted with the goods include:
Quality Guarantee
Design parameters and drawings of machined parts
Inspection report of pipe fittings (including A raw material re inspection report; B radiographic inspection report; C heat treatment report; D ultrasonic inspection report; E magnetic particle inspection report; F geometric dimension inspection report; G various reports formulated through consultation with users)
Material and weight of pipe fittings
HEBEI CANGRUN PIPELINE EQUIPMENT CO.,LTD is a professional manufacturer of industrial pipes 、 industrial pipe fittings and valves, based in China. Our products include all types of industrial pipe fittings, industrial pipe, industrial flange and industrial valves, they are widely used in electric power, petrochemical, chemical, pharmaceutical, boiler, heating, shipbuilding, and other industries.
We strive to provide the best customer service to our clients. For instance, we offer free samples and a three year quality warranty on all of our products. We can also provide customized pipes according to your specific requirements, and OEM service is available upon request.
We are located in Cangzhou City of Hebei Province, close to a large sea port, helping us arrange the shipment quickly and reduce more fees for our clients.
If necessary, feel free to contact us and look forward to your inquiry.
Post time: Nov-27-2022
